Managing Tasks
All the described functions to manage your tasks are accessible from the main task view.
Create new Tasks
- The New Task Dialog
- Click the New task button in the toolbar to get an empty dialog where you enter the tasks properties like title, description, start/due dates and reminder settings. Click Save to finally add it to the selected task list.
- Quick Entry
The text box in the centre of the toolbar area lets you add new tasks very fast by simply entering a title and then press <Enter> on the keyboard. Tasks will be created in the currently selected list.
Begin the quick entry with a date or time description like “Tomorrow” or “Monday at 16:00” to directly assign a due date to the task.
Edit Tasks
The Edit Dialog
When clicking a task item in list a dialog showing its details is displayed. Clicking the Edit button in that dialog opens the form to edit all properties of the selected task.
The edit form is divided into different section which can be switched using the tabs on top of the dialog:
Summary
This general section has text fields and selectors for various properties. Here’s a description of all the possible values:
- Title: The title of the task. This is what you will see in the list.
- Description: Any text that describes the task. Links and email addresses will be become clickable.
- Tags: A list of tags assigned to this task. Add one by typing to the text box and hit <Enter>.
- Start: The date/time, the task is supposed to be worked on.
- Due: The date/time this job is due. Define a time when setting a reminder for this task.
- Reminder: This will pop up with an notification at a the specified time before the task is due.
- Complete: The completeness state of a task in percent. Use the slider or enter a number.
- Tasklist: The list the task is saved in. Change it to move an event from one list to another.
Attachments
Append files and documents related to this task directly as attachments. Switch to the Attachments tab to upload files to the current task or to remove them again. Adding files works pretty much the same as attaching them to email messages: first select a file from your local disk and click Upload in order to attach it.
Note
Don’t forget to finally save the changes by clicking Save in the edit dialog. Switching back and forth the tabs will not yet save the data.
Assign Tags
Tags help you organize your tasks in the list view. Open the Edit Dialog and enter tags into the according text box:
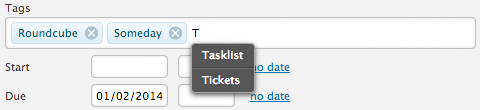
Append a tag by hitting <Enter> and continue typing to add more. While typing, a suggestion of already used tags will be shown. Use the arrow keys on the keyboard to select one and press <Enter> to select.
Remove tags with a click on the Remove icon.
Drag & Drop Tags
Existing tags listed in the tags box on the left can also be assigned to tasks directly in the list view by simply dragging the tag from the box and drop it on a task bar.
Set Due Dates
Assign due dates to your tasks to not miss your deadlines and to enable reminder notifications for them. The due dates with time can be entered in the Edit Dialog. When entering the input field, a small calendar widget will help you to quickly select a date.
Due dates can also be entered or changed directly in the list view without going to the edit dialog. Click the due date or the “no date” area on the right end of a task bar and select a date from the calendar widget. The change will be saved immediately.
Mark Tasks as Complete
In the Edit Tasks section we learned how to set a percentage value for a task’s completeness. Until a task isn’t fully completed, the percentage is displayed as a think horizontal line in the list view.
In order to mark a task as complete, simply click the checkbox in the list view. The task is now grayed out and moved to the bottom of the list. After some time or when refreshing the list, completed tasks will be removed from the view. You can still find them with the Complete quick filter. Uncheck the box to bring it back to the normal list.
Organize Tasks in Groups
For bigger jobs or entire projects, tasks can be divided into subtasks and organized hierarchically to visualize dependencies.
Create a Subtask
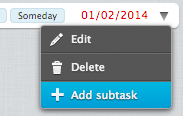
- Open the options menu of a task from the arrow icon on the far right of the task bar.
- Select Add subtask
- Enter the subtask properties in the Edit Dialog
- Press Save to insert it
Re-organize Groups
The hierarchical nesting of tasks and subtasks can be changed at any time. Simple grab a task with the mouse and drop onto another one to make it a subtask. This works for entire subtrees equally well. While dragging, a possible drop target is highlighted when moving over it.
Drop a task onto the small bar on top of the tasks list to make it a main task again.
If you organize your tasks in different lists, dropping a task onto a task list in the box on the left moves it (and all child tasks) to that particular list.
Get Notifications
While logged in to the webmail, reminders about soon-to-be due tasks will be displayed with pop-up boxes at the specified time before the task is due. You can specify if you want to see reminders for every task list individually. Enable or disable reminders in Task List Settings from the Task Lists.
Read how to Dismiss or Snooze Reminders in the calendar section.
Delete Tasks
Usually finished tasks are marked as complete. But there are still situations where you might want to actually delete a task.
- Open the options menu of a task from the arrow icon on the far right of the task bar.
- Select Delete.
- Click Delete again in the confirmation dialog.