Manage Your Schedule
All functions to maintain your events are accessible from the main calendar view.
Add Events to a Calendar
- Via toolbar
- Click the New event button in the toolbar to get an empty dialog where you enter the event properties such as summary, date/time, reminders, etc. Click Save to finally add it to the selected calendar.
- At a specific date/time
Navigate the calendar view to the date you want to add an event for. Then mark the range of time (or dates in month view) with the mouse by pressing the button at the time the event should start and releasing it again at time it finishes. This will open the event dialog with the selected date/time range already filled in.
In order to create new all-day events, double-click the desired day in the calendar view.
Edit and Reschedule Events
The Event Dialog
When clicking an event in the calendar view, a dialog showing its details is displayed. Clicking the Edit button in that dialog opens the form to edit all properties of the selected event.
The edit form is divided into different section which can be switched using the tabs on top of the dialog:
Summary
This general section has text fields and selectors for various properties of an event. Here’s a description of all the possible values:
- Summary: The title of the event. This is what you will see in the calendar view.
- Location: Where the event will be taking place.
- Description: Any text that describes the event.
- URL: A link to more information about this event.
- Start: Date and time when the event starts.
- End: Date and time when the event starts.
- all-day: Check this if the event has no start/end time.
- Reminder: Will pop up with an notification at a the specified time before the event.
- Calendar: The calendar the event is saved in. Change it to move an event from one calendar to another.
- Category: The type of event. Categories can also be used for coloring.
- Show me as: The representation in your free/busy scheduling calendar visible to others.
- Priority: The priority value of the event.
- Privacy: Flag an event as “private” or “confidential” when sharing your calendar with others.
Recurrence
For periodically recurring event series, this tabs has the settings how an event is repeated over time.
- Repeat: Start with selecting a repetition interval (e.g. monthly)
- Every: How often the frequency will be relevant. For example, for an event that takes place every other week choose Weekly and then 2. If you choose a frequency of weekly or monthly you can select which days of the week or month the event will occur.
- Until: Determines the duration of the repetition. The recurrence can either run forever, for a number it times or until a specific date.
Participants
An important part of managing your schedule is to invite others to events and track their RSVP. In this part of the edit dialog you can manage the participants of an event. Read more about this further down in the Inviting Other People section.
Attachments
Sometimes a description text isn’t enough to collect information for a specific event. Switch to this tab to attach files to the current event or to remove them again. Adding files works pretty much the same as attaching them to email messages: first select a file from your local disk and click Upload in order to attach it.
Note
Don’t forget to finally save the changes by clicking Save in the event edit dialog. Even switching back and forth the tabs will not yet save the data.
Moving and Resizing with the Mouse
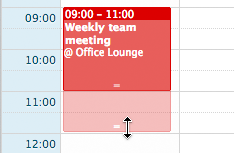
If an existing event shall be rescheduled to another time or date, you’ll find it handy to do that directly in the calendar view without opening the edit form. Simply grab the event block with the mouse and move it to the new date or time. Release the mouse button to complete.
In Month and Day view, the event blocks have a small handle at the bottom. Drag this with the mouse in order to resize the event meaning to adjust its duration.
Get Notifications
While logged in to the webmail, event reminders will be displayed with pop-up boxes at the specified time before the event starts. You can specify if you want to see alarms for every calendar individually. Enable or disable reminders in Calendar Settings from the Calendars List.
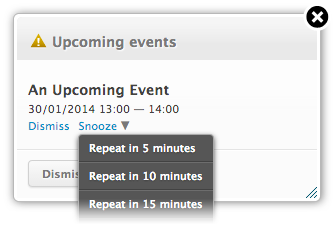
Dismiss or Snooze Reminders
When a reminder box pops up, you can either dismiss the notification for all events or each one individually. When dismissed, no further reminders will be displayed. Choose a time from the Snooze menu to get another reminder after the selected time.
Inviting Other People
If you need to set up a meeting, and keep track of who’s attending and who is not, the calendar can do this as well as you to automatically send invitations and read their responses.
When creating a new event, switch to the Participants tab. You’re already listed as the organizer of the event.
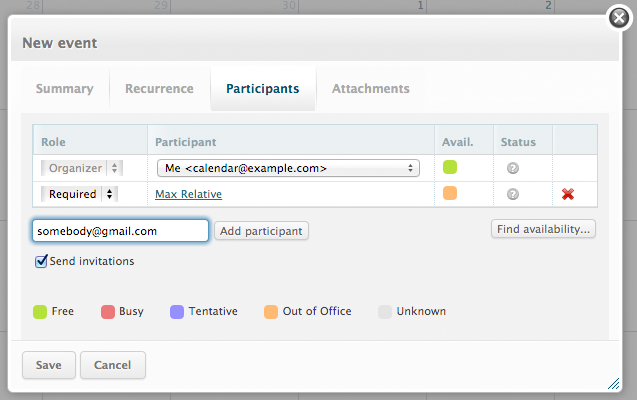
- Enter the name or email address of the person to invite. Contacts from the address book are suggested as you type. In order to send invitations, make sure the entered contact has an email address. Type it in the form Person Name <email@address.com>.
- Click Add participant to add the person to the list.
- Select a Role (e.g. required or optional) for this person.
- Repeat 1-3 for further participants.
- Check the Send invitations box if the application should send out invitation emails.
Invitations will be sent out when you click Save and the event is created.
Find Availability
Once all the participants are added to the list, you see the individual availability status for each one of them, given that this information is available. In case not everybody is free, click the Find availability... button to open the scheduling dialog. In that dialog, detailed availability information for all participants is displayed. Use the Previous/Next Slot buttons to find the next time slot where all required participants are available. Or drag the gray area representing the event duration with the mouse to manually select a free slot.
Click Select to copy the rescheduled date/time back into the event form and to close this dialog.
Receive Event Invitations
How to process incoming event invitations is described in chapter Handle Event Invitations.